Published Derrell Sloan on June 22, 2020
In a previous blog post, we outlined the recommended procedure for shutting down a VGA instrument. In this post, we’ll go through the process of bringing a VGA instrument back into service after it has been shutdown for an extended period of time. As soon as a VGA instrument is turned off several significant things occur: the heaters get turned off, all gas flow stops, and all the valves get closed – which means the instrument is no longer purging. As soon as purging ceases, atmosphere will slowly start to backflow into the instrument, and increased atmosphere equals decreased signal because water and oxygen both absorb very strongly below ~ 170 nm.
When bringing a VGA instrument back up there are two main tasks that must be accomplished before you can resume measurements. First, the system temperature, typically 275° C, must be reached and maintained. Second, the system must be purged to remove any atmosphere in the beam path before obtaining sufficient signal to perform measurements.
To bring a VGA instrument back into service, these are the recommend steps — assuming the instrument has been powered off for an extended time and the VUVision™ Software is not running:
- Ensure that your 2 gas supplies to the instrument have sufficient pressure. The System gas used to purge the instrument (typically nitrogen, helium, or argon) should have an inlet pressure of 60-90 psi. The CDA (clean dry air) gas used to run the pneumatics should have an inlet pressure of 70-90 psi. The most common cause of faults I see when first bringing an instrument up are due to one of the inlet gas pressures being out of range. If possible, check them first before launching VUVision to ensure they are within the specified ranges.
- Disconnect the USB cable from the back of the VGA instrument. This may sound counter intuitive, but if the VGA instrument was turned off, and the computer running the instrument was left on, then the hardware in the instrument was still partially powered via the USB connection. In some cases this can leave the hardware in a odd state. To force the hardware to properly reinitialize all the power must be removed which means disconnecting the USB cable (and turning the VGA off if it wasn’t already).
- Wait 30 seconds after disconnecting the USB cable to allow time for the hardware to fully power down.
- If the computer controlling the instrument has been turned off turn it on and allow it to initialize.
- Turn the VGA power on
- Reconnect the USB cable
- Wait 30 seconds to allow the computer time to recognize the hardware and load the appropriate drivers. If you launch VUVision before the hardware initializes and the computer loads the drivers a hardware fault can occur or VUVision may think the hardware isn’t present and will simulated the hardware.
- Launch VUVision. This will initialize the communication with the hardware, turn the heaters on, turn the lamp on, and put the instrument into a purged state.
It typically takes about an hour for the system to heat up from room temperature to 275° C. And in many cases, by the time the temperature heats up to 275° C and stabilizes the instrument will have had sufficient time to purge and achieve good signal.
In some cases it may be necessary to purge the instrument longer, possibly even overnight, before it is possible to achieve good signal. To speed up the purging process set the Makeup gas and System pressure setpoints to their maximum value of 5 psi. To do this open the Service Mode window as shown in Figure 1.
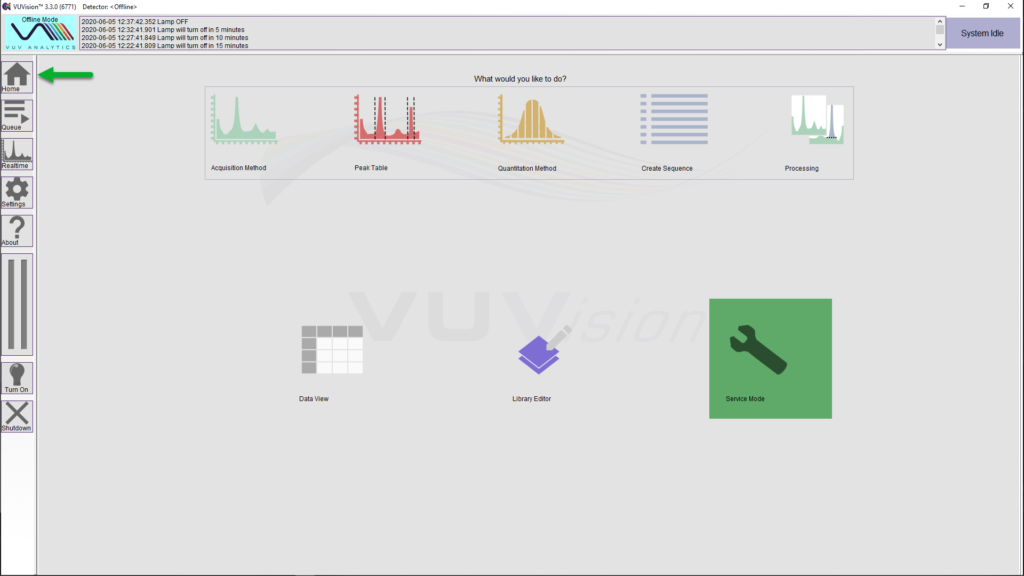
Figure 1 – VUVision software main menu with the Service Mode icon highlighted in green.
Set the Makeup gas and System pressure controller set points to 5 psi as shown in Figure 2.
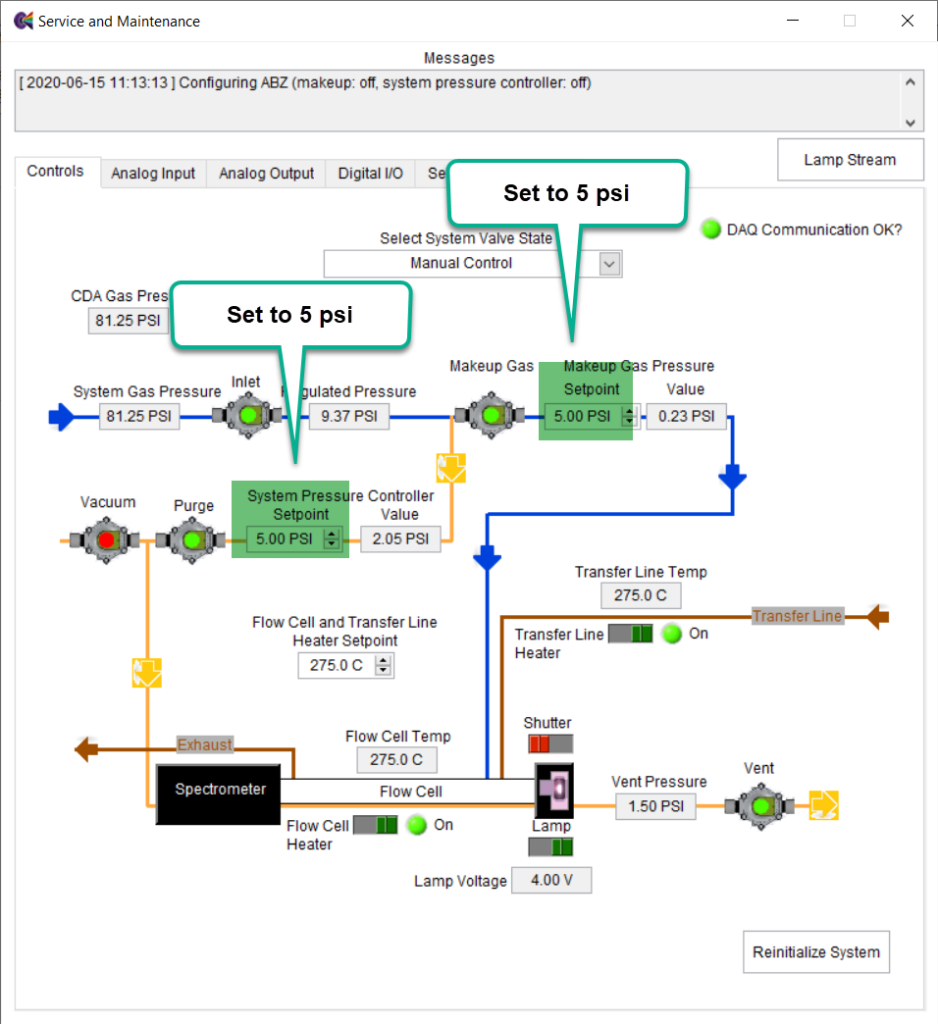
Figure 2 – Service mode window
Typically the Makeup gas pressure will be ~ 0.25 – 0.45 psi and the System pressure will be ~ 2.5 psi. The default values for these settings can be seen (and set) on the Settings tab (Figure 3) of the Service Mode window:
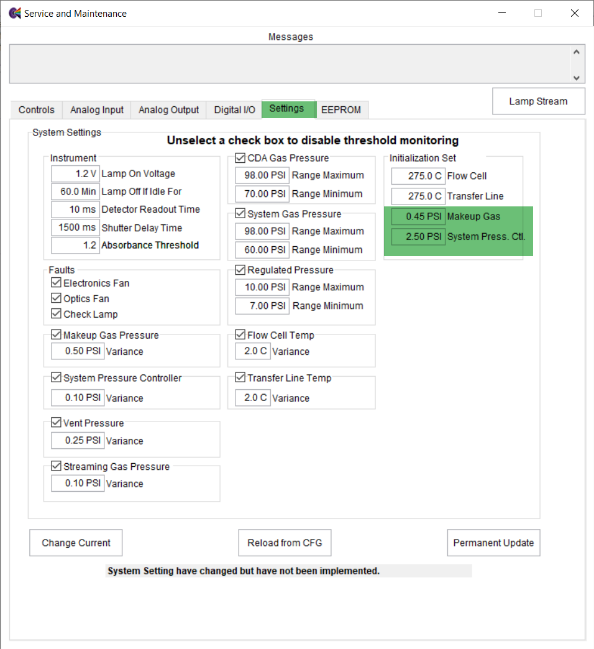
Figure 3 – Settings tab in the Service Mode window
Setting the Makeup gas and System pressures to 5 psi will maximize the flow of gas through the instrument and decrease the time required to purge the system and achieve good signal. Once good signal is obtained, they can be set back to their original default values.
How do you know if the system is purged out well and has obtained good signal? Follow the light and you will know the truth. The best way to tell if the system is purged out well is to look at the signal output from the lamp. The easiest way to do this is to go to the Realtime window (Figure 4) and click the [Acquire Spectra] button (if the lamp is turned off the [Acquire Spectra] button will be disabled).
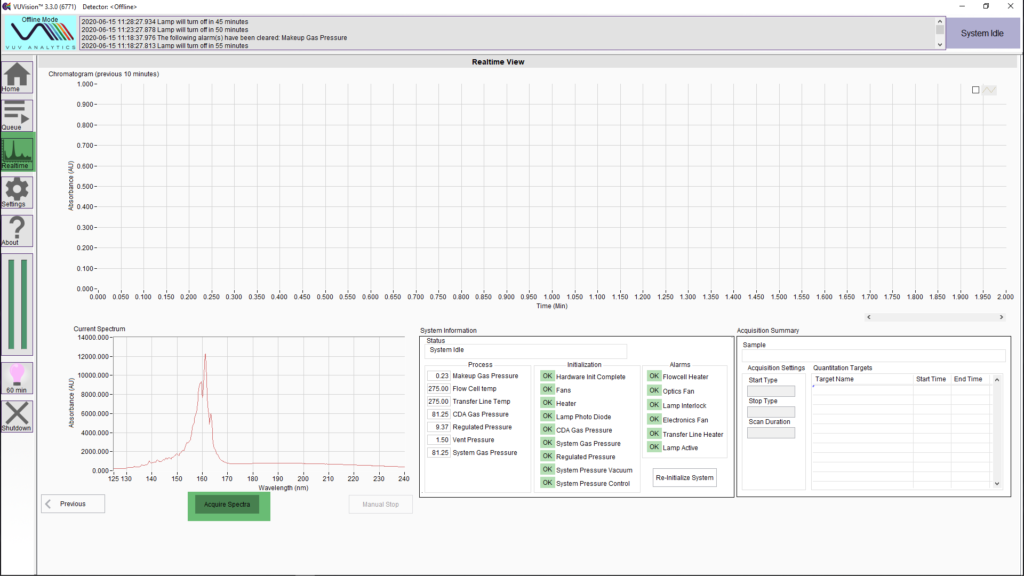
Figure 4 – Real time Window with the Acquire Spectra button highlighted in green.
It is very likely that the instrument will have little to no signal below ~ 170 nm to start off with and look something like what is shown in Figure 5:
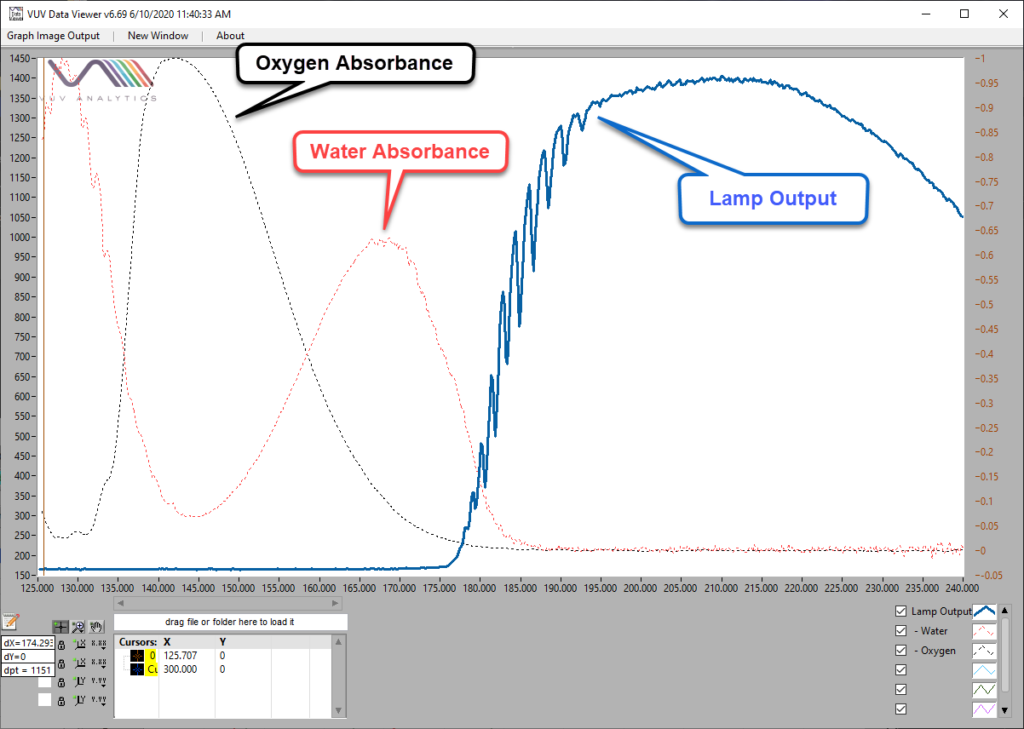
Figure 5 – Acquired Spectra
The blue plot shows what the initial lamp signal could look like. The absorbance spectra for oxygen (black plot) and water (red plot) are also shown and it is easy to see why you might not see any signal below ~ 175 nm when there is some atmosphere that hasn’t been purged out of the instrument.
As the atmosphere purges out you should start to see two peaks growing in around 158 and 161 nm. Figure 6 shows some spectra showing what the lamp signal looks like at different stages:
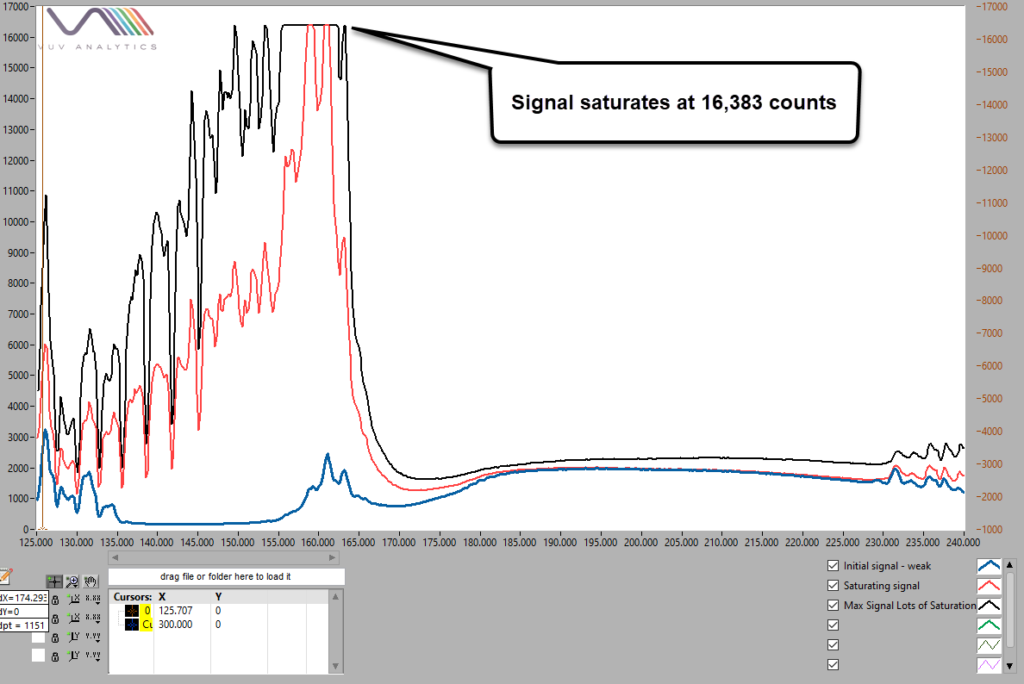
Figure 6 – Lamp spectra at different stages
The blue plot shows the peaks at 158 and 161 just starting to grow in. The signal should continue to increase and should eventually resemble the red plot. The black plot shows what the signal looks like when it increases enough to saturate the detector, which occurs when the signal reached 16,383 counts. The sharp negative peaks below 145 nm are due to nitrogen absorbance. If the instrument is being purged with helium or argon these negative peaks will not be present. Ideally the maximum signal at 161 nm should be somewhere in the 11,000 to 15,500 count range. If the signal is saturating, or is much below 11,000 counts, the source optic mirror position should be adjusted. If you need assistance with this please contact support@vuvanalytics.com.
Once your instrument has heated up and the signal from the lamp looks good you are ready to acquire some more of that wonderful VUV data.



Leave a Reply